페이지

2020년 6월 20일 토요일

Local Environment Setup

* If you are still willing to set up your environment for Go programming language, you need the following software available on your computer:
- A text editor
- Go compiler

The source code written in source file is the human readable source for your program. It needs to be compiled and turned into machine language so that your CPU can actually execute the program as per the instructions given. The Go programming language compiler compiles the source code into its final executable program.

Go distribution comes as a binary installable for FreeBSD(release 8 and above), Linux, Mac OS X(Snow Leopard and above), and Windows operating systems with 32-bit(386) and 64-bit(amd64) x86 processor architectures.
The following section explains how to install Go binary distribution on various OS.


- Download Go Archive
Download the latest version of Go installable archive file from Go Downloads. The following version is used in this tutorial: go1.4.windows-and64.msi.

it is copied it into C:\>go folder.

Installation on UNIX/Linux/Mac OS X, and FreeBSD
Extract the download archive into the folder /usr/local, createing a Go tree in
/usr/local/go. For example:
tar -C /user/local -xzf go1.4.linux-amd64.tar.gz
Add /usr/local/go/bin to the PATH environment variable.


export PATH=$PATH:/usr/local/go/bin


2020년 6월 19일 금요일

Try it Option Online

* You really do not need to set up your own environment to start learning Go programming language. Reason is very simple, we already have set up Go Programming environment online, so that you can compile and execute all the available examples online at the same time when you are doing your theory work.

* This gives you confidence in what you are reading and to check the result with different options. Feel free to modify any example and execute it online.

Try the following example using the Try it option available at the top right corner of the following sample code displayed on our website:

package main

import "fmt"

func main() {fmt.Println("Hello, World!")
}

For most of the examples given in this tutorial, you will find a Try it option.


Compiling Java in the Shell(Optional)

 * Java programs get compiled into object code for an imaginary CPU called the "Java Virtual Machine"(JVM). Consequently, you can't execute compiled Java code directly, You must run program that simulates a JVM and let that simulated computer execute the Java code.

* That may seem a little convoluted, but the JVM simulator is easier to write than a "true" compiler. Consequently, JVM simulators can be built into other programs (such as web browsers), allowing Java code compiled on one machine to be executed on almost any other machine. By contrast, a true native-code compiler (e.g., g++) produces executable that can only be run on a single kind of computer.

* The command to compile Java code is "javac" ("c" for compiler) and the command to execute compiled java code is "java". So a typical sequence to compile and execute a single-file Java program would b

javac -g MyProgram.java
java MyhProgram


* Unlike most programming languages, Java includes some important restrictions on the file names used to store source code.

Java source code is stored in files ending with the extension ".java".

Each Java source code file must contain exactly one public class declaration.

* The base name of the file (the part before the extension) must be the same (including upper/lower case characters) as the name of the public class it contains.

So the command

javac -g MyProgram.java

* ocmpiles a file that must contain the code:

public 
class MyProgram ...

The output of this compilatioin will be a file named MyProgram.class ( and possibly some other .class files as well).

* If we have a program that consists of multiple files, we can simply compile each file in turn:

javac -g MyProgram.java
javac -g MyADT.java

but this might not be necessary. If one Java file imports another, then the imported file will be automatically compiled if no .class file for it exists.


Understanding the Error Message

* Cascading one thing to keep in mind i that errors, especially errors in declarations, can cascade, with one "misunderstanding" by the compiler leading to a whole host of later messages. For example, if you meant to write

string s;

but instead wrote

strng s;

* You will certainly get an error message for the unknown symbol strng. However, there's also the factor that the compiler really doesn't know what types any symbol of unknown type is supposed to be an int. So every time you subsequently uses in a "string-like" mananer, e.g.,

s = s + "abcdef";

or

sting t = s.substring(k,m);

* The compiler will probably issue further complaints. Sometimes, therefore, it's best to stop after fixing a few declaration errors and recompile to see how many of the other messages need to be taken seriously.

* Backtracking A compiler can only report where it detected a problem. Where you actually committed a mistake may be someplace entirely different.

The vast majority of error messages that C++ programmers will see are


* syntax eror (missing brackets, semi-colons, etc.)
undeclared symbols
undefined symbols
type errors (usually "cannot find a matching function" complaints)

const errors

Let's look at these from the point of view of the compiler.


Capturing Compiler Output

* There are other ways to capture the output of a compiler (or of any running program). You can run the compiler within the emacs editor, which then gives you a simple command to move from error message to error message, automatically bringing up the source code file on the line cited in the error message. This works with both the UNIX and the MS Windows ports of emacs, and is the technique I use myself. Vim, the "vi improved" editor will do the same.

* Finally, in UNIX there is a command clalled "script" that causes all output to your screen to be captured in a file.
Just say

script log.txt

and all output to your screen will be copied into log.txt until you say

exit

* script output can be kind of ugly, because it includes all the control characters that you type or that your programs use to control formatting on the screen, but it's still useful.


Pipes and redirection

* We introduced pipes and redirection earlier. The complicating factor here is that what you want to pipe or redirect is not the standard output stream, but the standard error stream. So, for example, doing something like

g++ myprogram.cpp >  compilation.log

or 

g++ mayprogram.cpp | more


* It won't work, because these commands are only redirecting the standard output stream. The error message will continue to blow on by.

How you pipe or redirect the standard error stream depends on the shell you are running:

Unix, running C-shell or TC-shell

* The > and | symbols can be modified to affect the standard error stream by appending a '&' character. So these commands do work:

g++ myprogram.cpp >& compilation.log
g++ myprogram.cpp |& more


* A useful program in this regard is tee, which copies its standard input both into the standard output and into a named file:

g++ myprogram.cpp |& tee compilation.log

Linux/CygWin , running bash

* The sequence "2>&1" in a command means "force the standard error to go wherever the standard output is going".. So we can do any of the following:

g++ myprogram.cpp 2>&1 > compilation.log
g++ myprogram.cpp 2>&1 | more

and we can still use tee:

g++ myporogram.cpp 2>&1 | tee compilation.log


Error Messages

* Unfortunately, once you start writing your own code, you will almost certainly make some mistakes and get some error messages from the compiler.

This is likely to lead to two problems: reading the messages, and understanding the messages.
Capturing the Error Messages


*Unless you are a far better programmer than I, you will not only get error messages, you will get so many that they overflow your telnet/xterm window.

How you handle this problem depends upon what command shell you are running, but there are two general approaches. You can use redirection and pipes to send the error messages somewhere more convenient or you can use programs that try to capture all output from a running program (i.e., the compiler).

*We've talked before about how many Unix commands are "filters", working from a single input stream and producing a single output stream. Actually, there are 3 standard streams in most operating systems: standard input, standard output, and standard error. These generally default to the keyboard for standard input and the screen for the other two, unless either the program or the person running the program redirects one or more of thes streams to a file or pipes the stream to / from another program.


Linkage Flags

-L directory                 Add directory to the list of places searched for precompiled libraries.
-llibname                   Link with the precompiled library liblibname.a


Compilation Flags

-c                               compile only, do not link
-o filename                  Use filename as the name of the compiled program
-Dsymbol-value             Define symbol during compilation.
-g                              Include debugging information in compiled code
                                 (required if you want to be able to run the gdb degugger).
-O                              Optimize the compiled code (produces smaller, faster programs
                                 but takes longer to compile)
-l directory                  Add directory to the list of places searched when a "system"
                                include (#include ...) is encountered.


Compiling With Multiple Non-Header Files

* A typical program will consist of many .cpp files. (See Figure 7.1, "Building 1 program from many files") Usually, each class or group of utility functions will have their definitions in a separate .cpp file that defines everything declared in the corresponding .h file. The .h file can then be #included by many different parts of the program that use those classes or functions, and the  .cpp file can be separately compiled once, then the resulting object code file is linked together with the object code from other .cpp files to form the complete program.

* Splitting the program into pieces like this helps, among other things, divide the responsibility for who can change what and reduces the amount of compilation that must take place after a change to a function body.

* When you have a program consisting of multiple files to be compiled separately, add a -c option to each compilation. This will cause the compiler to generate a .o object code file instead of an executable. Then invoke the compiler on all the .o files together without the -c to link them together and produce an executable:

g++ -g -c file1.cpp
g++ -g -c file2.cpp
g++ -g -c file3.cpp
g++ -g -o programName file1.o file2.o file3.o

* (If there are no other .o files in that directory, the last command can often be abbreviated to "g++ -o programName -g *.o".) The same procedure works for the gcc compiler as well.

Actually, you don't have to type separate compilation commands for each file. You can do the whole thing in one step:

g++ -g -o programName file1.cpp file2.cpp file3.cpp

* But the step-by-step procedure is a good habit to get into. As you begin debugging your code, you are likely to make changes to only one file at a time. If, for example, you find and fix a bug in file2.cpp, you need to only recompile that file and relink:

g++ -g -c file2.cpp
g++ -g -o programName file1.o file2.o file3.o

Use an editor (e.g., emacs) to prepare the follwing files:

hellomain.cpp

#include <iostream>
#include "sayhello.h"

using namespace std;

int main()
{
   sayHello();
   return 0;
}


sayhello.h

#ifndef SAYHELLO_H
#define SAYHELLO_H

void sayHello();

#endif

sayhello.cpp

#include <iostream>;
#include "sayhello.h"

using namespace std;

void sayHello()
  count << "hello in 2parts!" << endl;
}

* To compile and run these, give the commands:

g++ -g -c sayhello.cpp
g++ -g -c hellomain.cpp
ls
g++ -g -o hello1 sayhello.o hellomain.o
ls
./hello1


* Note, when you do the first ls, tht the first two g++ invocations created some .o files.

Alternatively, you can compile these in one step. Give the command

rm hello1 *.o
ls

just to clean up after the previous steps, then try compiling this way:

g++ -g -o hello2 hellomain.cpp sayhello.cpp
ls 
./hello2

* An even better way to manage multiple source files is to use the make command.
Some Useful Compiler Options

* Another useful option in these compilers is -D. If you add an option -Dname=value, then all occurrences of the identifier name in the program will be replaced by value. This can be useful as a way of customizing programs without editing them. If you use this option without a value, -Dname, then the compiler still notes that name has been "defined". This is useful in conjunction with compiler directive ifdef, which causes certain code to be compiled only if a particular name is defined. For example, many programmers will insert debugging output into their code this way:

...
x= f(x,y,z);
#ifdef DEBUG
   cerr << "the value of X is: " << x <<endl;
#endif
y=g(z,x);
...

* The output statement in this code will be ignored by the compiler unless the option -DDEBUG is included in the command line when the compiler is run.[38]

Sometimes your program may need functions from a previously-compiled library. For example, the sqrt and other mathematical functions are kept in the "m" library (the filename is actually libm.a). To add functions from this library to your program, you would use the "-lm" option. (The "m" in "-lm" is the library name.) this is a linkage option, so it goes at the end of the command:

g++ -g -c file1.cpp
g++ -g -c file2.cpp
g++ -g -c file3.cpp
g++ -g -o programName file1.o file2.o file3.o -lm

The general form of gcc/g++ commands is g++ compilation-option files linker-options Here is a summary of the most commonly used options for gcc/g++:


Compiling a Program with Only One Non-Header File

Use an editor (e.g., emacs) to prepare the following files:

hello.cpp

#include <iostream>

using namespace std;

int main()
{
   count << "Hello from C++!" << endl;
   return 0;
}

hello.c

#include<stdio.h>
int main()
{
   printf("Hello from C!\n");
   return 0;
}

To compile and run these, give the commands:

g++ -g hello.cpp
ls

Notice that a file a.out has been created.

./a.out
gcc -g hello.c
./a.out

* The compiler generates an executable program called a.out If you don't like that name, you can use the mv command to rename it.

Alternatively, use a -o option to specify the name you would like for the compiled program:

g++ -g -o hello1 hello.cpp
./hello1
gcc -g -o hello2 hello.c
./hello2

* In the example above, we placed "./" in front of the file name of our compiled program to run it, in general, running prgrams is no different from running ordinary Unix commands. You just type

pathToProgramOrCommand parameters

In fact, almost all of the "commands" that we have used in this course are actually programs that were compiled as part of the installation of the Unix operation system.

* As we have noted earlier, we don't usually give the command/program name as a lengthy file path. We say, for example, "ls" instead of "/bin/ls". That works because certain directories, such as /bin, are automatically searched for a program of the appropriate name. This set of directories is referred to as your execution path. Your account was set up so that the directories holding the most commonly used Unix commands and programs are already in the execution path. You can see your path by giving the command

* echo $PATH

One thing that you will likely find i that your $PATH probably does not include ".", your current directory. Placing the current directory into the $PATH is considered a (minor) security risk, but that means that, if we had simply typed "a.out" or "hello", those programs would not have been found because the current directory is not in the search path. Hence, we gave the explicit path to the program files, "/a.out" and "./hello".


What Goes into a Header File? What Goes Into a Non-Header File?

* Pretty much everyghing that has a "name" in C++ must be declared before you can use it. Many of these things must also be defined, but that can generally be done at a much later time.

* You declare a name by saying what kind of thing it is:

  const int MaxSize;                 //  declares a constant
  extern int v;                         // declares a variable
  void foo (int formalParam);     // declares a function(and a formal parameter)
  class Bar{...};                        // declares a class
  typedef Bar* BarPointer;        // declares a type name


* In most cases, once you have declared a name, you can write code that uses it. Furthermore, a program may declare the same thing any number of times, as long as it does so consistently. That's why a single header file can be included by several different non-header files that make up a program - header files contain only declarations.

* You define constants, variables, and functions as follows:

const int MaxSize = 1000;                        // defines a constant
int v;                                                   // defines a variable
void foo(int formalParam){++formalParam;} //defines a function

* A definition must be seen by the compiler once and only once in all the compilations that get linked together to form the final program. A definition is itself also a declaration (i.e., if you define something that hasn't been declared yet, that's OK. The definition will serve double duty as declaration and definition.).

* When a non-header file is compiled, we get an object-code file, usually ending in ".o". These are binary files that are "almost" executable - for some variables and function, instead of the actual address of that variable/function; they still have its name. This happens when the variable or function is declared but not defined in that non-header file ( after expansion of #includes by the pre-processor).

* That name will be assigned an address only when a file containing a definition of that name is compiled. And that address will only be recorded in the object code file corresponding to the non-header source file where the name was defined.

* The complete executable program is then produced by linking all the object code files together. The job of the linker is to find. for each name appearing in the object code, the address that was eventually assigned to that name, make the substitution, and produce a true binary executable in which all names have been replaced by addresses.

* Understanding this difference and how the entire compilation/build process works (Figure 7.1, "Building 1 program from many files") can help to explain some common but confusingly similar error messages:

If the compiler says that a function is undeclared, it means that you tried to use it before presenting its declaration, or forgot to declare it at all.

* The compiler never complains about definitions, because an apparently missing definition might just be in some other non-header file you are going to compile later. but when you try to produce the executable program by linking all the compiled object code files produced by the compiler, the linker may complain that a symbol is undefined (none of the compiled files provided a definition) or is multiply defined (you provided two definitions for one name, or somehow compiled the same definition into more than one object-code file).

* For example, if you forget a function body, the linker will eventually complain that the function is undefined. If you put a variable or function definition in a .h file and include that file from more than one place, the linker will complain that the name is multiply defined.


Compiling and Executing Go Programs

* Now that you know how to create and edit files, you can generate new programs. The most commonly used languages in the CS Department at the moment are C++, C, and Java.

The most popular C++ and C compilers are g++ and gcc. 
The Structure of C++ and C Programs

* Although not really a Unix-specific topic, it's hard to discuss how to compile code under any operating system wityhout a basic understanding how programs are put together.

* The source code for a C++(or C) program is contained in a number of text files called source files. Very simple programs might be contained within a single source file, but as our programs grow larger and more complicated, programmers try to keep things manageable by splitting the code into multiple source files, no one of which should b terribly long.

* There are two dirrenrent kinds of source files: header files and not-header files. Header files are generally given names ending in ".h". Non-header files are generally given names ending in ".cpp" for C++ code and ".c" for C code.

* Header and non-header files are treated differently when we build programs. Each non-header file i compiled separately from the others (Figure 7.1, "Building 1 program from many files"). This helps keep the compilation times reasonable, particularly when we are fixing bugs in a program and may have changed only one or two non-header files. Only those changed files need to b recompiled.

* Header files are not compiled directly, Instead, header files are included into other source files via #include. In fact, when you invoke a C/C++ compiler, before the "real" compiler starts, it runs a pre-processor whose job is to handle the special instructions that begin with #. In the case of #include statements, the pre-processor simply grabs the relevant header file and sticks it content into the program right at the spot of the #include.


#include <iostream>
#incldue <string>

using namesapce std;
int main()
{
    string greeting = "Hello!";
    cout << greeting << endl;
    return 0;
}

* This can result in a dramatic increase in the amount of code that actually gets processed. The code shown here, for example, is pretty basic. But the #include statements bring in a entire library of I/O and string-related declarations from the C++ standard library. Here, for example, is the output of the pre-processor for one compiler. (If you look at the very end, you can recognize the main code for this program.)

* A header file can be #included from any number of other header and non-header files. That is, in fact, the whole point of having header files. Header files should contain declarations of things that need to be shared by multiple other source files. Non-header files should declare only things that do not need to be shared.

* As we go though all the compilation steps required to build a program, anything that appears in a non-header file will be processed exactly once by the compiler.
Anything that appears in a header file may be processed multiple times by the compiler.


Go Programs

* A Go program can vary in length from 3 lines to millions of lines and it should be written into one or more text files with the extension ".go". For example, hello.Go.  You can use "vi" ", "vim" or any other text editor to write your Go program into a file.

Features Excluded Intentinally


* To keep the language simple and concise, the following features commonly available in other similar languages are omitted in Go:

1. Support for type inheritance
2. Support for method or operator overloading
3. Support for circular dependencies among packages
4. Support for pointer arithmetic
5. Support for assertions
6. Support for generic programming


Features of Go Programming

Binaries

* Go generates binaries for your applications with all the dependencies built-in. This removes the need for you to install runtimes that are necessary for running your application. This eases the task of deploying apoplications and providing necessary updates across thousands of ins tallations. With its support for multiple OS and processor architectures, this is a big win for the language.

Language Design

* The designers of the language made a conscious decision to keep the language simple and easy to understand. The entire specification is in a small number of pages and some interesting design decisions were made vis-a-vis Object-Oriented support in the language that keeps the features limited.

* Towards this, the language is opinionated and recommends an idiomatic way of achieving things. It prefers Composition over Inheritance and its Type System is elegant and allows for behavior to be added without tight coupling the components too much. In Go Language, "Do More with Less" is the mantra.

Powerful Standard Library

* Go comes with a powerful standard library, distributed as packages. This library caters to most components, libraries that developers have come to expect from 3rd party packages when it comes to other languages. A look at the Packages available in the standard library is good enough indication of the power available in them.


Package Management

* Go combines modern day developer workflow of working with Open Source projects and includes that in the way it manages external packages. Support is provided directly in the tooling to get external packages and publish your own packages in a set of easy commands.

Static Typing

* Go is a statically typed language and the compiler works hard to ensure that the code is not just able to compile correctly but other type conversions and compatibility are taken care of. This can avoid the problems that one faces in dynamically typed languages, where you discover the issues only when the code is executed.

Concurrency Support

* One area where the language shines is its first-class support for Concurrency in the language itself. If you have programming concurrency in other languages, you understand that it is quite complex to do so. Go Concurrency primitives via go routines and channels makes concurrent programming easy. Its ability to take advantage of multi-core processor architectures and efficient memory is one of the reasons while Go code is today running some of the most heavily used applications that are able to scale.

Testing Support

* Go Language brings Unit Testing right into the language itself. It provides a simple mechanism to write your unit tests in parallel with your code. The tooling also provides support to understand code coverage by your tests, benchmarking tests and writing example code that is used in generating your code documentation.

* Go has seen sighnificant adoption from large projects and due to its tooling, ecosystem and language design, programmers are steadily moving towards it, especially while building out infrastructure pieces. We expect that its popularity will continue to rise. Getting started with Go is straightforward and the Go Programming Language Home page has everything from installing the tool-chain to learning about Go.


2020년 5월 10일 일요일

What is Kubernetes?

In 2017, Docker adoption was up 40%
amongst Datadog's very large customer base
source: "8 Surprising facts About Real Docker Adoption." Datadog, April 2017

The median number of containers running on a single host is aboput 10.
Source: "The 2017 Dockedr Usage Report." Sysdig, April 17, 2017

How do you manage all these containers running on a single host, and across your whole infrastructure?

Orchestrator Features 
* Provision hosts
* Instantiate containers on a host
* Restart failing containers
* Expose containers as services outside the cluster
* Scale the cluster up or down

Kubernetes(K8s)
* Definition: an open-source platform designed to automate deploying, scaling, and operating application containers
* Goal: to foster an ecosystem of components and tools that relieve the burden of running applications in public and private clouds 

Borg was the predecessor to Kubernetes.

Kubernetes is a platform to schedule and run containers on clusters of virtual machines. It runs on bare metal, virtual machines, private datacenter and public cloud.

No golden handcuffs when migrating to the cloud

Kubernetes and Docker
Kubernetes is a container platform

You can use Docker containers to develop and build applicastions, and then use Kubernetes to run these applications on your infrastructure.

Features Kubernetes
"Kubernetes is an open source project that enables software teams of all sizes, from a small startup to a Fortune 100 comapny, to automate deploying, scaling, and managing applications on a group or cluster of server machines..."
"These applications can include everything from internalfacing web applications like a content management system to marquee web properties like Gamil to big data processing."
- Joe Beda

Multi-Host
Container Scheduling
* Done by the kube-scheduler
* Assigns pods to nodes at runtime
* Checks resources, quality of service, policies, and user specifications before scheduling


Scalability and Availability
* K8s master can be deployed in a highly available configuration
* Multi-region deployments available

Scalability (v 1.8)
* Supports 5,000 node clusters
* 150,000 total pods
* Pods can be horizontally scaled via API

Flexibility and Modularization
* Plug-and-play architecture
* Extend architecture when needed
* Add-ons: network dirvers, service3 discovery, container runtime, visualization, and command

Registration
Seamless nodes register themselves with master

Service Discovery
Automatic detection of services and endpoints via DNS or environment variables.

Persistent Storage
* Much requested and important feature when working with containers
* Podc can use persistent volumes to store data
* Data retained across pod restarts and crashes


2020년 5월 9일 토요일

What Is Containerization?

1. History of Containers


Container:
A collection of software processes unified by one namespace, with access to an operating system kernel that ist shares with other containers and little to no access between containers.


Dociker Instance
A runtime instance of a Docker image contains three things:
1. A Docker image
2. An execution environment
3. A standard set of instructions


Virtual Machine (VM)
* One or many applications
* The necessary binaries and libraries
* The entire guest operating system to interact with the applications

Containers
* Include the application and all of its dependencies
* Share the kernel with other containers
* Not tied to infrastructure only needs Docker Engine installed on the host
* Run as isolated processes in user space on the host OS

Container Benefits for Developers
Applicaton are
1. Portable
2. Packaged in a standard way

Deployment is 
1. Easy
2. Repeatable

Container Benefits for Developers
* Automated testing, packaging, and integrations
* Support newer microservice architectures
* Alleviate platform compatibility issues

Container Benefits for DevOps
* Reliable deployments: improve speed and frequency of releases
* Consistent application lifecycle: configure once and run multiple times

Container Benefits for DevOps

Consistent environments
* No more process differences between dev and production environments

Simple scaling
* Fast deployments ease the addition of workers and poermit workeload to grow and shrink for on-demand use cases


The DevOps team can isolate and debug issues at the container level.

Use of Containerized Apps on the Rise

Among 195 organizations surveyed in January 2017, organizations expect that their number of containerized applications will rise by 80% in the next tow years.

Containers: Real Adoption And Use Cases In 2017 (March 2017), Forrester Consulting Thought Leadership Paper Commissioned by Dell EMC, Intel, and RedHat

Containers and Microservices

Allow the Building of Pipelines

* Containers bring agility toi your code
* Help build a continuous integration and deployment pipeline
* Push an IT team to develop, test, and deploy applications faster


2020년 5월 5일 화요일

Spring Cloud

Addressing the issues found in cloud-native applications

Module Outline

1. Spring / Spring IO / Spring Cloud
2. Spring Cloud Netflix
3. Common Concepts

Spring Cloud Origins

1. First, there was the Spring Framework (2004)
  - Alternative to low-level JEE approaches

2. Next, Spring sub-projects emerged (2006 - present)
  - Spring Security, Web Flow, Integration, Batch, Web Services, XD, Social, Data, Boot, Session, etc.
  - Organized under Spring IO umbrella:
 

Spring Could Subproject
1. "Sub-Umbrella" Project within Spring IO Platform


Goal of Spring Cloud

1. Provide libraries to apply common patterns needed in distributed applications
  - Distributed / Versioned / Centralized Configuration Management
  - Service Registration and Discovery
  - Load Balancing
  - Service-to-service Calls
  - Circuit Breakers
  - Routing
  - ....

Where Does NETFLIX Fit Into All of This?

1. Netfliz reinvented itself since early 2007
   - Moved from DVD mailing to video-on-demand
      * Once USPS largest first-class customer
      * Now biggest source of North American Internet traffic in evenings.

2. Became Trailbazers in Cloud Computing
   - All Running on Amazon Web Services

3. Chose to publish many general-=user technologies as Open-Source projects
   - Proprietary video-streaming technologies are still secret.

Spring and NETFLIX
1. The Spring Team has always been forward looking
  - Trying to Focus on Applications of Tomorrow

2. Netflix OSS Mature and Battle-Tested; Why Reinvent?

3. Netflix OSS Not Necessarily Easy and Convernient
  - Spring Cloud provides easy interaction
     * Dependencies
     * Annotations


Spring Cloud Setup
1. Spring Cloud Projects are all based on Spring Boot
  - Difficult to employ using only core Spring Framework
  - Dependency management based on Boot
  - ApplicationContext startup process modified


Server vs. Client

1. "Client" and "Server" are relative terms
  - Based on the role in a relationship
  - A Microservice is ofter a client and a server

2. Don't get lost on the terminology!


Required Dependenies

1. Replace Spring Boot Parent
  - Spring Cloud proejct are based on Spring Boot


org.springframework.cloud
spring-cloud-starter-parent
Angel.SR4


org.springframework.cloud
spring-cloud-start-...


2. ... OR Use Dependency Management Section


org.springframework.cloud
spring-boot-starter-parent
Angel.SR4
pom
import


org.springframework.cloud
spring-boot-starter-...


Summary
1. Spring Cloud is a sub-project within Spring IO Umbrella
  - And is itself an umbrella project.

2. Spring Cloud addresses common patterns in distributed computing
3. Spring Cloud enables easy use of Netflix libraries
4. Spring Cloud i based on Spring Boot


Spring Cloud Config

Centralized, versioned configuration management for distributed applications


Objectives

1. At the end of this module, you will be able to
  - Explain what Spring Cloud Config is
  - Build and Run and spring Cloud Config Server
  - Establish a Repository
  - Build, Run, and Configure a Client

Module Outline

1. Configuration Management
   - Challenges
   - Desired Solution

2. Spring Cloud Config
   - Server Side
   - Client Side

3. Repository Organization

What is Application Configuration?

1. Application are more than just code
  - Connections to resources, other applications

2. Usually use external configuration to adjust software behavior
  - Where resources are located
  - How to connect to the DB
  - Etc.

Configuration Options

1. Package configuration files with application
  - Requires rebuild, restart

2. Configuration files in common file system
  - Unavailable in cloud

3. Use environment variables
  - Done differently on different platforms
  - Large # of individual variables to manage / duplicate

4. Use a cloud-vendor specific solution
  - Coupling application to specific environment

Other Challenges

1. Microservices -> large # of dependent services    <--- brittle="" manual="" p="" work="">
2. Dynamic updates
  - Changes to services of environment variables require restage of restart  <-- activities="" deployment="" p="">
3. Version control   <-- p="" traceablity="">

Desired Solution for Configuration

1. Platform / Cloud-Independent solution
  - Language-independent too

2. Centralized
  - Or a few discrete sources of our choosing

3. Dynamic
  - Ability to update settings while an application is running

4. Controllable
  - Same SCM choices we use with software

5. Passive
  - Services (Applications) should do most of the work themselves by self-registering

Solution:
1. Spring Cloud Config
  - Provides centralized, externalized, secured, easy-to-reach source of application configuration

2. Spring Cloud Bus
  - Provides simple way to notify clients to config changes

3. Spring Cloud Netflix Eureka
  - Service Discovery - Allows applications to register themselves as clients

Spring Cloud Config
1. Designates a centralized server to server-up configuration information
  - Configuration itself can be backed by source control

2. Clients connect over HTTP and retrieve their configuration settings
  - In addition to their own, internal sources of configuration


Spring Cloud config Server

1. Source available at GitHub:
https://github.com/spring-cloud-samples/configserver

2. Or, it is reasonably easy to build your own

Spring Cloud Config Server _Building, part 1

1. Include minimal dependencies in your POM(or Gradle)
  - Spring Cloud Starter Parent
  - Spring Cloud Config Server


org.springframework.cloud
spring-cloud-starter-parent
Angel.SR4


org.springframework.cloud
spring-cloud-config-server


Spring Cloud Config Server  _ Building, part 2

1. application.yml - indicates location of configuration repository

---
spring:
   cloud:
      config:
         server:
            git:
              uri: https://github.com/kennyk65/              searchPaths:ConfigData


   - ...or application.properties

Spring Cloud Config Server _ Building, part 3

1. Add @EnableConfigServer

   @SpringBootApplication
   @EnableConfigServer
   public class Applicaton{
   
         public static void main(String[] args){
               SpringApplication.run(Application.class, args);
         }
    }


2. That's it!

The Client Side - Building part 1

1. Use the Spring Cloud Starter parent as a Parent POM:


   org.springframework.cloouod
   spring-cloudstarter-parent
   Angel.SR4


2....OR use a Dependency management section:


           org.springframework.cloouod
           spring-cloud-starter-parent
           Angel.SR4
           pom
           import


The Client Side - Building Part 2

1. Include the Spring Cloud Starter for config:


           org.springframework.cloouod
           spring-cloud-starter-config


2. Configure application anme and server location in bootstrap.properties / yml

   - so it is examined early in the startup process
   # bootstrap.properties:
      spring.application.name: lucky-word
      spring.cloud.config.uri:  http://localhost:8001

3. That's it!
  - Client connects at startup for additional configuration settings.

EnvironmentRepository - Choices

1. Spring Cloud Config Server uses an
  EnvironmentRepository
    - Two implementations available: Git and Native (local files)

2. Implement EnvironmentRepository to use other sources.

Environment Repository - Organization

1. Configuration file naming converntion:
  - -.yml
     * Or .properties (yml takes precedence)

  - spring.application.name = - set by client application's bootstrap.yml(or .properties)
  - Profile - Client's spring.profiles.active
    * (set various ways)

2. Obtain settings from server:
   - http://://
   - String client do this automatically on startup

The Client Side
1. Spring Boot Applications: Include:
   - Spring cloud client dependency
   
       
org.springframework.cloud
        spring-cloud-starter
     

   - Configure application name and server location in bootstrap .properties /yml
      * So it is examined early in the startup process
       # bootstrap.properties:
       spring.application.name:lucky-world
       spring.cloud.config.uri: http://localhost:8888

2. That's It!
   - Client connects at startup for additional configuration settings.

Environment Repository - Organization Example

1. Assume client application named "lucky-world" and profile set to "northamerica"
  - Spring client (automatically) requests
    * /luck-word/northamerica

 lucky-word-default.yml                     <-- ignored="" is="" p="" profile="" set=""> lucky-word.yml                               <-- included="" p="" prededent="" second=""> lucky-word-northamerica.yml             <-- first="" included="" p="" precedent=""> lucky-word-europe.yml                     <-- diffrent="" ignored="" p="" profile="" set=""> lucky-word.properties                      <-- included="" p="" precedent="" third=""> another-app.yml                             <-- app="" diffrent="" ignored="" p="">
.yml vs .properties

1. Settings can be stored in either YAML or standard Java properties files

   - Both have advantages
   - Config server will favor .yml over .properties

# .properties file
spring.config.name=aaa
spring.config.location=bbb
spring.profiles.active=ccc
spring.profiles.include=ddd


# .yml file
-----
spring:
  config:
     name: aaa
     location:  bbb
  profiles:
    active: ccc
    include: ddd

Profiles
 
  1. YAML Format can hold multiple profiles in a single file
   
      # lucky-word-east.proerties
      luck-word: Clover

      # lucky-word-west.properties
      luck-word: Rabbit's Foot

     # luckyword.yml
     ---
     spring:
        profiles: east
     lucky-word: Clover
   
    ---
     spring:
       profiles:west
    lucky-word: Rabbit's Foot


The Client Side

1. How Properties work in Spring Applications
   - Spring apps have an Environment object
   - Environment object contains multiple PropertiySources
      * Typically populated from environment variables, system properties, JNDI, developer-specified property files, etc.
   - Spring Cloud Config Client library simply adds another PropertySource
      * By connecting to server over HTTP
      * http://://

   - Result: Properties descried by server become part of client application's environment

What about non-Java / non-Spring Clients?

1. Spring Cloud Server exposes properties over simple HTTP interpace
    - http://://

2. Reasonably easy to call server from any application
    - Just not as automated as Spring

What if the Config Server is Down?

1. Spring Cloude Config Server should typically run on serveral instances
   - So downitme should be a non-issue

2. Clinet application can control policy of how to handle missing config server
   - spring.cloud.config.failFast=true
   - Deafult is false

3. Config Server settings override local settings
   - Strategy: provide local fallback settings.

Spring Cloud Ribbon
1. Understanding and Using Ribbon, The clinet side load balancer

Objectives
1. At the end of this module, you will be able to
- Understand the purpose of Client-Side Load Balancing
- Use Spring Cloud Ribbon to implement Client-Side Load Balancing

What is a Load Balancer?

1. Traditional load balancers are server-side components
  - Distribute incoming traffic among serveral servers
  - Software (Apache, Nginx, HA Proxy) or Hardware(F5, NSX, BigIP)


Clinet-Side Load Balancer

1. Clinet-Side Load Balancer selects which server to call
   - Based on some criteria
   - Part of client software
   - Server can still employ its own load balancer


Why?

1. Not all servers are the same
  - Some may be unavaliable(faults)
  - Some may be slower than other (performance)
  - Some may be further away than others (regions)


Module Outline
1. Clinet Side Load Balancing
2. Spring Coud Netflix Ribbon

Spring Cloud Netflix Ribbon
1. Ribbon - Another part of the Netflix OSS family
  - Clinet side load balancer
  - Automatically integrates with service discovery (Eureka)
  - Built in failure resiliency (Hystrix)
  - Caching / Batching
  - Multiple protocols (HTTP, TCP, UDP)
2. Spring Cloud provides an easy API Wrapper for using Ribbon.

Key Ribbon Concepts

1. List of Servers
2. Filtered List of Servers
3. Load Balancer
4. Ping

List of Servers
1. Determines what the list of possible servers are (for a given service (client))
   - Static - Populated via configuration
   - Dynamic - Populated via Service Discovery ( Eureka )

2. Spring Cloud default - Use Eureka when present on the classpath.


Filtered List of Servers

1. Criteria by which you wish to limit the total list
2. spring Cloud default - Filter servers in the same zone

ping

1. Used to test if the server is up or down
2. Spring Cloud default - delegate to Eureka to determine if server is up or down

Load Balancer

1. The Load Balancer is the actual component that routes the calls to the servers in the filtered list

2. Serveral strategies available, but they usually defer to a Rule component to make the actual decisions

3. Spring Cloud's Default: ZoneAwareLoadBalancer


Rule

1. The Rule is the single module of intelligence that makes the decision on whether to call or not.
2. Spring Cloud's Default: ZoneAvoidanceRule

Using Ribbon with Spring Cloud - part 1

1. Use the Spring Cloud Starter parent as a Parent POM:

  org.springframework.cloud
  spring-cloud-starter-parent
  Angel.SR4


2. ... OR use a Dependency management section:


         org.springframework.cloud
         spring-cloud-starer-parent
         Angel.SR4
         pom
         import


...exactly the same options as a spring cloud config client or a spring cloud eureka client.

Using Ribbon with Spring Cloud - part 2

1. Include dependency:
   
     
          org.springframework.cloud
          spring-cloud-starter-ribbon


Using Ribbon with Spring Cloud - part 3

1. Low-level technique:
  - Access LoadBalancer, use directly:

   public class MyClass{
       @Autowired LoadBalancerClient loadBalancer;

       public void doStuff(){
            ServiceInstance instance = loadBalancer.choose("subject");
            URI subjectUri = URI.create(String.format("http://$s:%s", instance.getHost(), instance.getPort());
            // ... do something with the URI
      }
}

API Reference
1. Previous example used Ribbon API directly
2. Not desirable - couples code to Ribbon
3. Upcoming examples will show declarative approach
  - Feign, Hystrix.

Customizing
1. Previously we escribed the deaults. What if you wnat to change them?
2. Declare a separate config with replacement bean.

@Configuration
@RibbonClient(name="subject", configuration=SubjecConfig.class)
public class MainConfig{
}


@Configuration
public class SubjectConfig{
   @Bean
   public IPing ribbonPing(IClientConfig config){
       return new PingUri();
  }
}

What Customizing Choices are available
1. Quite a Few!
- Recommend looking at the JavaDoc or GitHub Code


Summary
1. Client-Siode Load Balancing augments regular load
balancing by allowing the client to select a server based on some criteria.

2. Spring Cloud Riboon is an easy-to-use implementation of client side load balancing.

Spring Cloud Feign

Declarative REST Client

Objectives
1. At the end of this module, you will be able to
  - Call REST services using the Feign libraries
  - Understand how Feign, Ribbon, and Eureka collaborate

Module Outline
1. What is Feign
2. How to use Feign

Feign
1. What is it?
  - Declarative REST client, from NetFlix
  - Allows you to write calls to REST services with no implementation code
  - Alternative to Rest Template (even easier!)
  - Spring Cloud provides easy wrapper for using Feign

Spring REST Template
1. Spring's Rest Template provides very easy way to call REST services

RestTemplate template = new RestTemplate();
String url = "http://inventoryService/{0}";
Sku sku = template.getForObject(uri, Sku.class, 4724352);

2. Still, this code must be
  1) Written
  2) Unit-tested with mocks / stubs.

Feign Alternative - Declarative Web Service Clients
1. How does it work?
  - Define interfaces for your REST client code
  - Annotate interface with Feign annotation
  - Annotate methods with Spring MVC annotations
    * Other implementations like JAX/RS pluggable

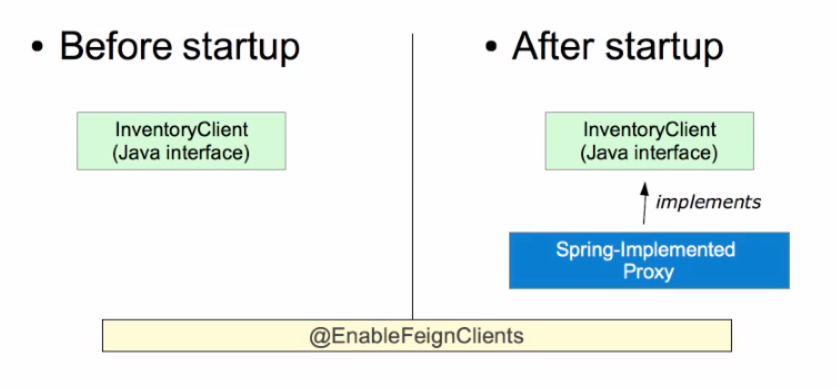
2. Spring Cloud will impleent it at run-time
  - Scans for interfaces
  - Automatically implements code to call REST service and process response


Feign Interface
1. Create an Interface, not a Class:


Note: No extra dependencies are needed for Feign when using Spring Cloud.

Runtime Implementations

1. Spring scans for @FeignClients
   - Provides implementations at runtime


2. That's it!
   - Implementations provided by Spring / Feign!

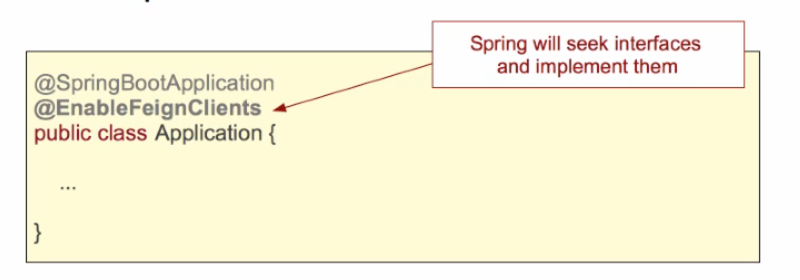
What does @EnableFeignClients do?

You can @Autowire an InventoryClient wherever one is needed


Ribbon and Eureka  _ Where do they fit in?

1. The previous example - hard-codeedURL
    @FeignClient(url="localhost:8080/warehouse")

2. ...use a Eureka "Client ID" instead:
     @FeignCliuent("warehouse")

3. Ribbon is automatically enabled
    - Eureka gives our application all "Clients" that match the given Client ID
    - Ribbon automatically applies load balancing
    - Feign hanldes the code.

Runtime Dependency

1. Feign starter required at runtime:
    ...but not compile time
     
         
             org.springframework.cloud
             spring-cloud-starter-feign


Summary
1. Feign provides a very easy way to call RESTful services
2. Feign integrates with Ribbon and Eureka automatically.


Spring Cloud Hystrix

Understanding and Applying Client Side Circuit Breakers

Objectives
1. At the end of this module, you will be able to
   - Understand how software circuit breakers protect against cascade failure
   - Use Spring Cloud Netflix Hystrix annotations within your software to implement circuit breakers
   - Establish simple monitoring of Circuit Breakers using Hystrix Dashboard and Turbine

Module Outline
1. Cascading Failures and the Circuit Breaker Solution
2. Using Spring Cloud Netflix Hystrix
3. Monitoring with the Hystrix Dashboard and Turbine


The Problem: Cascading Failure
1. Having a large number of services as dependencies can lead to a 'cascading failures'
2.Without mitigating this, microservices are a recipe for certain disaster!


Distributed Systems - More Failure Opportunities

1. Distributed systems -> more opportunity for failure.
   - Remember tghe Fallacies of Distributed Computing.

2. The Math: Assume 99.95% Uptime (Amazon EC2 SLA)
  - Single app - 22 minutes down per montjhe
  - 30 interrelated services - 11 hours downtime per month ( bad )
  - 100 interrelated services - 36 hours downtime per month ( ouich! )

The Circuit Breaker Pattern

1. Consider a household circuit breaker
  - It "watches" a circuit
  - When failure occurs ( too much current flow ), it "opens" the circuit (disconnects the circuit )
  - Once problem is resolved, you can manually "close: the breaker by flipping the switch.
  - Prevents cascade failure
   * i.e. - your house burning down.

Hystrix - The Software Circuit Breaker

1. Hystrix - Part of Netflix OSS
2. Light, easy-to-use wrapper provided by Spring Cloud.
3. Detects failure conditions and "opens" to disallows further calls
   - Hystrix Default - 20 failures in 5 seconds
4. Identify "fallback" - what to do in case of a service dependency failure
  - Think: catch block, but more sophisticated
  - Fallbacks can be chained
5. Automatically "closes" itself after interval
  - Hystrix Default - 5 seconds.


Comparison with Physical Circuit Breaker


Hystrix  ( Spring Cloud ) Setup

1. Add the Dependency:
 
    org.springframework.cloud
     spring-cloud-starter-hystrix
 

2. Enable Hystrix within a configuration class:
@SpringBootApplication
@EnableHystrix
public class Application {
}


2020년 4월 2일 목요일

Spring Boot


  • What is Spring Boot
  1. Radically faster getting started experience
  2. "Opinionated" approach to configuration / defaults
       - Intelligent defaults
       - Gets out of the way quickly


    3. What does it involve?
       - Easier dependency management
       - Automatic configuration / reasonable defaults
       - Different build / deployment options.


  • What Spring Boot is NOT
  1. Plugins for IDEs
       - Use Boot with any IDE(or none at all)

    2. Code generation

___________________________________________________________________________
Demonstration - Spring Boot

Create a new, bare-bones Spring application

eclipse
Help -> eclipse marketplace -> spring ide search -> Spring Tools 4 (aka Spring Tool suite 4) 4.6.0. RELEASE -> install -> restart

Project Explorer right click -> new -> other -> Spring Boot -> Spring Starter Project

name: microserviceBoot, java Version 8 -> next -> next


"Tomcat version 8.0 only supports J2EE 1.2, 1.3, 1.4, and Java EE 5 and 6 WEb modules"
project foloer .settings>org.eclipse.wst.common.project.facet.core.xm


  4.0
"/>  => 2.5


____________________________________________________________________________

  • Spring Boot - What just Happened?
  1. Boilerplate project structure created
      - Mostly folder structure
      - "Application" class + test
      - Maven POM (or Gradle if desired)

    2. Dependency Management


  • Running Spring Boot-What Just Happened?
  1. SpringApplication
        - Created Spring Application Context

    2. @SpringBootApplication
       - Combination of @Configuration
           i) Marks a configuration file
           ii) Java equivalent of file
       
       - ...And @ComponentScan
           i) Looks for @Componenrts (none at the moment)

       - ...And @EnableAutoConfiguration
           i) Master runtime switch for Spring Boot
           ii) Examines ApplicationContext & classpath
           iii) Creates missing beans based on intelligent defaults


____________________________________________________________________________________
Demonstration - Adding Web Capability

- Adding spring-boot-starter-web dependency
- Adding HelloController

pom.xml
spring-boot-starter => spring-boot-starter-web

com.example.demo package
create classes => WhateverIWant

package com.example.demo;

import org.springframework.stereotype.Controller;
import org.springframework.web.bind.annotation.RequestMapping;
import org.springframework.web.bind.annotation.ResponseBody;

@Controller
public class WhateverIWant {

@RequestMapping("/hi")
public @ResponseBody String hiThere()
{
return "hello world!";
}

}


Run As -> Spring Boot App

____________________________________________________________________________________

  • Adding Web - What Just Happened?
  1. spring-boot-starter-web Dependency
       - Adds spring-web, spring-mvc jars
       - Adds embedded Tomcat jars

    2. When application starts...
       - Your beans are created
       - @EnableAutoConfiguration looks for  'missing' beans
          i) Based on your beans + classpath
          ii) Notices @Controller / Spring MVC jars
     
       - Automatically creates MVC beans
          i) DispatcherServlet, HandlerMappings, Adapters, ViewResolvers

       - Launches embedded Tomcat instance.


  • But wait, I want a WAR...
  1. To Convert from JAR to WAR:
      - Change POM packaging
      - Extend SpringBootServletInitializer


   2. Deploy to app server
      - URL becomes http://localhost:8080//

_______________________________________________________________________________________

Demonstration - WAR Deployment

-WAR Packaging
-SpringBootServletInitializer


pom.xml

element 
 jar -> war
 or add war


MicroservicesBootApplication.java

package com.example.demo;

import org.springframework.boot.SpringApplication;
import org.springframework.boot.autoconfigure.SpringBootApplication;
import org.springframework.boot.builder.SpringApplicationBuilder;
import org.springframework.boot.web.servlet.support.SpringBootServletInitializer;

@SpringBootApplication
public class MicroservicesBootApplication extends SpringBootServletInitializer{


/**
* Used when run as a JAR
* @param args
*/
public static void main(String[] args) {
SpringApplication.run(MicroservicesBootApplication.class, args);
}

/**
* Used when run as a WAR
*/
@Override
protected SpringApplicationBuilder configure(SpringApplicationBuilder builder) {

return builder.sources(MicroservicesBootApplication.class);
}


}

________________________________________________________________________________________

  • What about Web Pages?
  1. Spring MVC supports a wide range of view options
  2. Easy to use JSP, Freemarker, Velocity, Thymeleaf
  3. Boot automatically establishes defaults
      - InternalResourceViewResolver for JSPs
      - ThymeleafViewResolver
         i) If Thymeleaf is on the classpath
    
     4. spring-boot-starter-thymeleaf

___________________________________________________________________________________________

Demonstration - Thymeleaf web pages

- spring-boot-starter-thymeleaf
- /templates folder
- Controller adjustments
- Web page


pom.xml

add


org.springframework.boot
spring-boot-starter-thymeleaf

search google  => spring boot reference

spring Boot Reference Guide

spring-boot-starter-thymeleaf 

resource add Folder
name: templates

add hello.html


Hello name-goes-heae from a Thymeleaf page


WhateverIWant.java

@RequestMapping("/hi/{name}")
public  String hiThere(Map model, @PathVariable String name)
{
model.put("name", name);
return "hello";
}

____________________________________________________________________________________________

  • What Just Happended?
  1. spring-boot-starter-theymeleaf
       - Brought in required jars
       - Automatically configured ThymeleafViewResolver

    2. Controller returned a 'logical view name'
   
    3. View Resolver found a matching template

    4. Render


  • But wait, I want JSPs...

  1. Thymeleaf and other templating approaches are way too advanced for my organization!
       - Besides, we have lots of existing JSPs


    2. No Problem!
  
    3. Just as easy to use JSPs!
       - Place JSPs in desired web-relative location
       - Set spring.mvc,view.prefix / spring.mvc.view.suffix as needed. 
       - (remove thymeleaf starter pom)

______________________________________________________________________________________________

Demonstration - JSP Web Pages

- Place JSP in desired folder
- Set spring.mvc.view.prefix / spring.mvc.view.suffix
- Exclude spring-boot-starter-tomcat

Project Explorer

src -> main -> webapp -> create folder -> WEB-INF -> views -> hello.jsp


Hello ${name} from a JSP page


src/main/resources/appcliaction.properties


spring.mvc.view.prefix=/WEB-INF/views/
spring.mvc.view.suffix=.jsp


_______________________________________________________________________________________________

  • What Just Happened?
  1. No ThymeleafViewRresolver configured
  2. Controller returned a 'logical view name'
  3. InternalResourceViewResolver forwarded to JSP
  4. Render


  • Spring & REST
  1. REST capability is built in to Spring MVC
      - Simply use domain objects as parameters / return values.
      - Mark with @RequestBody / @ResponseBody
      - Spring MVC automatically handles XML/JSON conversion
           *Based on converters available in classpath.


___________________________________________________________________________________________

DemonStration - REST Controllers in Spring MVC
 
- Additional domain objects
- Automatic HTTP Message Conversion


package com.example.demo.domain;

public class Player {

String name;
String position;


public Player() {
super();

}


public Player(String name, String position) {
this();
this.name = name;
this.position = position;
}
public String getName() {
return name;
}
public void setName(String name) {
this.name = name;
}
public String getPosition() {
return position;
}
public void setPosition(String position) {
this.position = position;
}


}


package com.example.demo.domain;

import java.util.Set;

public class Team {
String name;
String location;
String mascotte;
Set players; 
public Team() {
super();
}

public Team(String location, String name, Set players) {
this();
this.location = location;
this.name = name;
this.players = players;
}
public String getName() {
return name;
}
public void setName(String name) {
this.name = name;
}
public String getLocation() {
return location;
}
public void setLocation(String location) {
this.location = location;
}
public String getMascotte() {
return mascotte;
}
public void setMascotte(String mascotte) {
this.mascotte = mascotte;
}
public Set getPlayers() {
return players;
}
public void setPlayers(Set players) {
this.players = players;
}

}


package com.example.demo;

import java.util.HashSet;
import java.util.Map;
import java.util.Set;

import javax.annotation.PostConstruct;

import org.springframework.stereotype.Controller;
import org.springframework.web.bind.annotation.PathVariable;
import org.springframework.web.bind.annotation.RequestMapping;
import org.springframework.web.bind.annotation.ResponseBody;

import com.example.demo.domain.Player;
import com.example.demo.domain.Team;

@Controller
public class WhateverIWant {
private Team team;
@PostConstruct
public void init()
{
Set players = new HashSet<>();
players.add(new Player("Charlien Brown", "pitcher"));
players.add(new Player("Snoopy", "shortstop"));
team = new Team("California", "Peanuts", players);
}
@RequestMapping("/hi")
public @ResponseBody Team hiThere()
{
return team;
}

}


____________________________________________________________________________________________


What Just Happened?

1. Controller returned a domain object
   - Not a logical view name (page)

2. Spring MVC noticed @ResponseBody
   - Or @RestController

3. Invoked correct HttpMessageConverter
  - Based on
     * Requested format
     * JARS on classpath


What if I want XML?

1. No Problem!

2. Annotate domain classes with JAXB annotations
  - JAXB already part of java SE

3. When App Starts
   - Spring creates HttpMessageConverter fo JAXB
      * Based on classpath contents

4. XML or JSON returned
   - based on requested format


@XmlRootElement   => xml out
Accept: application/xml

Accept: application/json


Adding JPA Capability

1. Adding the spring-boot-starter-data-jps Dependency
   - Adds Spring JDBC/ Transaction Management
   - Adds Spring ORM
   - Adds Hibernate / entity manager
   - Adds Spring Data JPA subproject
     * (explained later)


2. Does NOT add a Database Driver
   - Add one manually (HSQL)


Spring Data JPA

1. Typical web application architecture

2. REST Controllers provide CRUD interface to clients

3. DAO provide CRUD interface to DB


Spring Data - Instant Repositories

1. Spring Data provides dynamic repositories

2. You provide the interface, Spring Data dynamically implements.
- JPA, MongoDB, GemFire, etc.

3. Service Layer / Controllers have almost no logic.


_____________________________________________________________________________________________

Demonstraion - Adding Spring Data JPA

- spring-boot-starter-data-jpa
- org.hsqldb / hsqldb
- Annotate domain objects with JPA
- Extend CrudRepository


pom.xml


org.springframework.boot
spring-boot-starter-data-jpa


org.hsqldb
hsqldb


package com.example.demo.domain;

import javax.persistence.Entity;
import javax.persistence.GeneratedValue;
import javax.persistence.Id;

@Entity
public class Player {

@Id @GeneratedValue
Long id;
String name;
String position;


public Player() {
super();

}


public Player(String name, String position) {
this();
this.name = name;
this.position = position;
}
public String getName() {
return name;
}
public void setName(String name) {
this.name = name;
}
public String getPosition() {
return position;
}
public void setPosition(String position) {
this.position = position;
}


}


package com.example.demo.domain;

import java.util.Set;

import javax.persistence.CascadeType;
import javax.persistence.Entity;
import javax.persistence.GeneratedValue;
import javax.persistence.Id;
import javax.persistence.JoinColumn;
import javax.persistence.OneToMany;
import javax.xml.bind.annotation.XmlRootElement;

@XmlRootElement
@Entity
public class Team {
@Id @GeneratedValue
Long id;
String name;
String location;
String mascotte;
@OneToMany(cascade=CascadeType.ALL) 
@JoinColumn(name="teamId")
Set players; 
public Team() {
super();
}

public Team(String location, String name, Set players) {
this();
this.location = location;
this.name = name;
this.players = players;
}
public String getName() {
return name;
}
public void setName(String name) {
this.name = name;
}
public String getLocation() {
return location;
}
public void setLocation(String location) {
this.location = location;
}
public String getMascotte() {
return mascotte;
}
public void setMascotte(String mascotte) {
this.mascotte = mascotte;
}
public Set getPlayers() {
return players;
}
public void setPlayers(Set players) {
this.players = players;
}

}

package com.example.demo.dao;


import java.util.List;

import org.springframework.data.repository.CrudRepository;

import com.example.demo.domain.Team;

public interface TeamDao extends CrudRepository {
List findAll();
Team findByName(String name);

}


package com.example.demo;

import java.util.HashSet;
import java.util.Set;

import javax.annotation.PostConstruct;

import org.springframework.beans.factory.annotation.Autowired;
import org.springframework.boot.SpringApplication;
import org.springframework.boot.autoconfigure.SpringBootApplication;
import org.springframework.boot.autoconfigure.jdbc.DataSourceAutoConfiguration;
import org.springframework.boot.builder.SpringApplicationBuilder;
import org.springframework.boot.web.servlet.support.SpringBootServletInitializer;

import com.example.demo.dao.TeamDao;
import com.example.demo.domain.Player;
import com.example.demo.domain.Team;

@SpringBootApplication
public class MicroservicesBootApplication extends SpringBootServletInitializer{

/**
* Used when run as a JAR
* @param args
*/
public static void main(String[] args) {
SpringApplication.run(MicroservicesBootApplication.class, args);
}

/**
* Used when run as a WAR
*/
@Override
protected SpringApplicationBuilder configure(SpringApplicationBuilder builder) {
return builder.sources(MicroservicesBootApplication.class);
}
@PostConstruct
public void init()
{
Set players = new HashSet<>();
players.add(new Player("Charlien Brown", "pitcher"));
players.add(new Player("Snoopy", "shortstop"));
Team team = new Team("California", "Peanuts", players);
teamDao.save(team);
}
@Autowired TeamDao teamDao;

}


package com.example.demo;

import java.util.HashSet;
import java.util.Map;
import java.util.Set;

import javax.annotation.PostConstruct;

import org.springframework.beans.factory.annotation.Autowired;
import org.springframework.stereotype.Controller;
import org.springframework.web.bind.annotation.PathVariable;
import org.springframework.web.bind.annotation.RequestMapping;
import org.springframework.web.bind.annotation.ResponseBody;
import org.springframework.web.bind.annotation.RestController;

import com.example.demo.dao.TeamDao;
import com.example.demo.domain.Player;
import com.example.demo.domain.Team;

@RestController
public class WhateverIWant {
@Autowired TeamDao teamDao;

@RequestMapping("/teams/{name}")
public  Team hiThere(@PathVariable String name)
{
return teamDao.findByName(name);
}

}

_____________________________________________________________________________________________

Adding Spring Data JPA - What Just Happened?

1. What I did:
  - Added dependencies for spring-boot-starter-data-jpa and hsqldb
  - Annotated Domain objects with plain JPA annotations
  - Added an interface for Spring Data JPA
  - Dependency injected info controller


2. When application starts...
   - Spring Data dynamically implements repositories
     * find*(), delete(), save() methods implemented.
   - DataSource, Transaction Management, all handled.


Spring Data - REST

1. Often, applicatons simply expose DAO methods as REST resources

2. String Data REST handles this automatically...

Adding Spring Data REST

1. Plugs into dynamic repositories

2. Generates RRESTful interface
 - GET, PUT, POST, DELETE

3. Code needed only to override defaults.


__________________________________________________________________________________________

__________________________________________________________________________________________

Adding Spring Data REST - What Just Happened?

1. when applicaton starts...
   - @RestResource annotations interpreted
   - @Controllers beans created
   - @RequestMappings created


Adding HATEOAS

1. Spring Data Rest simply returns RESTful resources
- Conversion handled by Jackson, or JAXB

2. Underlying Data Relationships used to build Links
- If matching repositories exist

3. Consider the Team -> Player relationship

4. Player Repository needed to force link creation


__________________________________________________________________________________________

Demonstration - Adding HATEOAS Links
-  Creating a Player DAO


package com.example.demo.domain;

import javax.persistence.Entity;
import javax.persistence.GeneratedValue;
import javax.persistence.Id;

@Entity
public class Player {

@Id @GeneratedValue
Long id;
String name;
String position;


public Player() {
super();

}


public Player(String name, String position) {
this();
this.name = name;
this.position = position;
}
public String getName() {
return name;
}
public void setName(String name) {
this.name = name;
}
public String getPosition() {
return position;
}
public void setPosition(String position) {
this.position = position;
}


}

_______________________________________________________________________________________________

HATEOAS - What Just Happened?

1. Spring Data REST noticed two repositories
  - The relationship between entities is know via JPA annotations.

2. Spring automatically represents the children as links
  - @RestResource determines names of links


Summary
1. Spring Boot makes it easy to start projects
  - And easy to add featrure sets to projects
  - Opinionated apporach
  - Run as JAR or WAR
  - Web Applications (JSP, Thymeleaf, others)

2. REST
  - Automatic resource conversion

3. Spring Data JPA
  - Automatic repository implementation
 
4. Spring Data REST
  - Automatic REST controllers